Clip Studio is a drawing software used to create digital illustrations, comics, and even animation with the Ex version. Before we can start creating art, you’ll need to first familiarise yourself with digital art mechanics. Assuming you already have Clip Studio and a drawing tablet, let’s begin the guide on shortcuts and workspace.
To start, when opening Clip Studio we first need to make a new file to start drawing, this will be in Clip Studio format. Click file → new and at default it’s set up for illustration. You will then choose a canvas size, the larger the canvas the better the quality, but that also requires a larger file. A good size is keeping the numbers close to 2000 x 2000 pixels to 3000 x 3000 px and keeping the resolution/DPI (Dots Per Inch) at 300. At the bottom left is the record timelapse, this allows you to record a timelapse of your drawing by going to file →timelapse→export timelapse.
The tools are on the left side with their icons, you can hover over them to know what each icon is for, but also the shortcut for quick access. The brush icon is where you will access your brushes, for quick access press B. Pressing B the second time will switch to airbrush, and the third time it will switch to pattern brush. Pressing E will toggle the eraser.
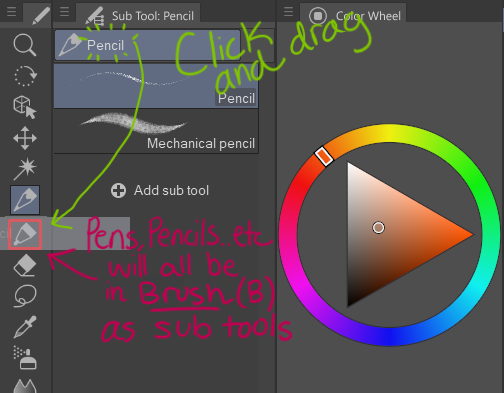
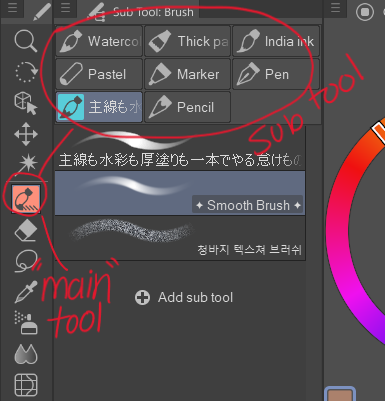
At default, your pen and pencil might be its tool. I find it easier when all the pens, pencils, etc are in one place kinda like sub-tools in the “main” tool, brush. This way I can go back and forth between brush and eraser using the hotkey b because the pen, pencils, etc all use the shortcut b.
You can check out the shortcuts here or you can go to file → shortcut settings to view shortcuts. These shortcuts can save you a lot of time when you don’t need to move your cursor across the screen to get something. Seems like there is a lot, but you really only need to learn a few, and once you have it down, it’s just muscle memory.
Shortcuts that I use
- Spacebar (As you hold the spacebar, click and drag where you want to move this helps you navigate the page)
- Ctrl+Alt (As you are holding Ctrl+Alt, click and drag on the screen to adjust brush and eraser size)
- Ctrl+Z (Undo)
- Ctrl+Shift+Z (Redo)
- Ctrl+Shift (As you hold, tap the color, line, etc, and it will send you directly to that layer. This is very useful when you have a lot of layers and need to go to the layer where you see a mistake.)
- I (Color Picker)
- Ctrl + (Zoom in, recommended to assign this to one of your express keys. Num 1 also works)
- Ctrl – (Zoom out, recommended to assign this to one of your express keys. Num 2 also works)
- Alt + spacebar (Another way to zoom in AND out. While you hold, click and drag on the screen to zoom in and out)
- M (Selection)
- G (bucket tool)
- R (Rotate, to reset rotation hit view→rotate/flip→reset rotation)
- C (Changes the brush into an eraser, click c again to reset)
- J (Liquify)
- J (Pressing J twice gives blend tool)
If your drawing tablet has some buttons/express keys, assign each button to your most used hotkeys. The hotkeys that I assign for my tablet are zoom in, zoom out, undo, and redo. Utilizing your express keys is like using your hotkeys/shortcuts and can save you a lot of time. There are a lot of different drawing tablets so make sure to search for a video on YouTube if you don’t know how to set up express keys already.
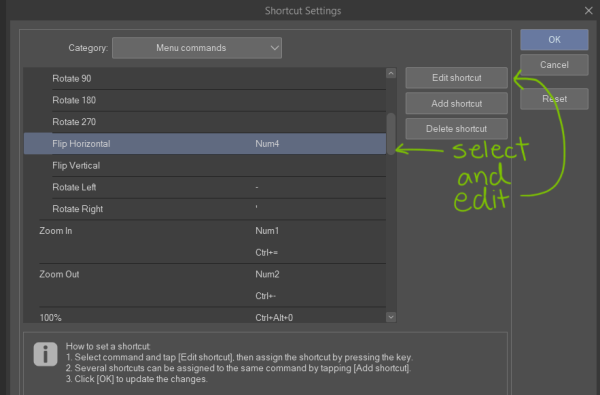
There isn’t a shortcut for everything by default such as flipping canvas horizontally. Instead of going to View →Rotate/Flip(V) → Flip Horizontal, go to File → Shortcut Settings to edit or add shortcuts. Here, I gave the “Flip Horizontal” shortcut Num4. Now I can just press Num4 to flip my canvas.
Note: You might’ve come across a similar problem as I did where you wanted to assign number pad 4 to one of the buttons/express keys on your tablet. However, it just shows up as “4” not “Num4″ when you hit the 4 on the number pad. And yes, “4” on the number pad is different from “4” on the row near the top of your keyboard. You need to have the num padlock on and this will give you num1 when pressing 4 on the number pad or else you won’t have the correct shortcut installed.
Your pen also would most likely come with two buttons, these are also for shortcuts. As you will be switching from brush to eraser, assign those to the buttons.
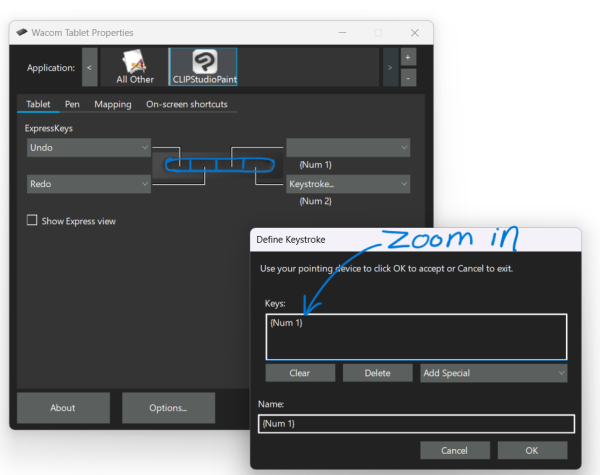
(Num 1 is a shortcut for zooming in)
You can also customize the default shortcuts, although this can get messy. You might want to change the bucket tool shortcut from g to b, but b is already taken by brush and airbrush and it’s a mess going from there. To keep things simple, don’t change the default.
Let’s dive into the workspace. By default, the interface just takes a lot of space and you want to prioritize what tools matter to you. A lot of the tools you won’t even come across using, in that case, you can hide these tools. Don’t worry, you can retrieve it if you change your mind. You can also go to Windows → workspace → reset to default to get back to the default workspace.
There is a lot to cover with how to customize your workspace so much so that all our workspaces are different. Customizing your workspace gives the software a cleaner look, is more organized (to you), and could also help you work faster. Now that you understand what workspace is and its importance, go ahead and watch this video. It covers a lot, but it’s worth it and necessary.
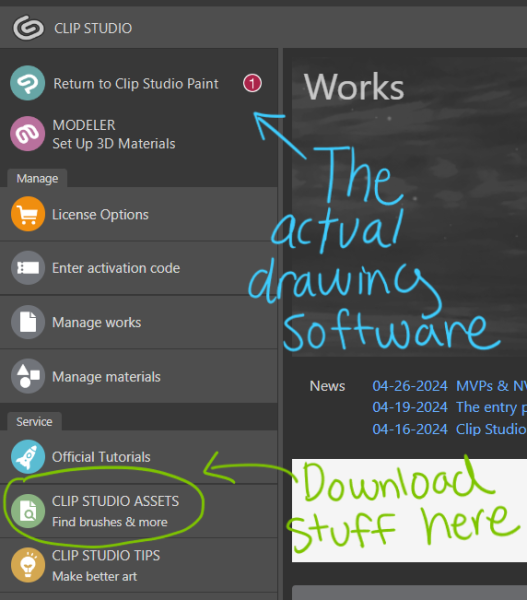
Don’t forget, you need to save your workspace! Go to Windows → workspace → register workspace and give it a name. If you are too lazy, you can download other people’s workspace.
In Clip Studio Assets, circled in green, you can download brushes, 3d poses, people’s workspace (your own is better), and more.
The drawing software does not automatically save, so make sure to hit Ctrl + S or go to file and save every once and a while. Keep all your drawings in one folder to stay organized. If you want to make the file as PNG click file → save as → and change the “save as type” from “CLIP STUDIO FORMAT” to “PNG”. Don’t worry, you still have your Clip Studio Format file even if the PNG file name is the same. If you want to make changes you can as long as you don’t delete that file with Clip Studio Format.
