
How to tie a tie
As time goes on, the world gets busier and busier. With that, things end up forgotten or lost. Which can range from many different things from big to small. Something that used to be passed on from parent to child regularly is now almost completely forgotten. That something is, how to tie a tie. It may not seem important or a useful skill to have until the day comes when you’re running late or scrambling to try and put a tie around your neck. So here is a step-by-step list of how to tie a tie and bowtie.
Four-in-hand knot
Step 1: Position the tie around your neck to where the wider end of the tie is twice as long as the skinnier one. No matter what step you’re on, make sure the tie remains flat and not twisted.
Step 2: Take the wider end of the tie and wrap it around the narrower end. The wider tie should now be in front of the smaller one. (The wider end should be sideways across, creating a loop around the skinnier one)
Step 3: After the last step you should now see a loop around your neck that has been made. Take the wider end of the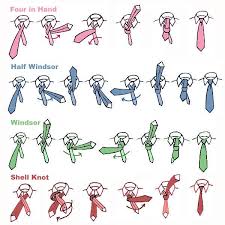 tie and bring it up through the loop.
Step 4: After bringing the wider end up and through the loop you should see a smaller loop or knot that is around the skinnier end, feed the wide end of the tie through it.
Step 5: Now, pull the knot tighter while making sure everything is straight and tight.
Step 6: You have now created a “Four in hand” knot. Take the skinnier end now and pull it snugly or wherever is comfortable for your liking. Feed the small end through the loop at on the back of the wider end to hide the skinny one behind it.
Bowtie
Step 1: To start, make one end longer than the other and cross the longer end over the shorter end.
Step 2: Then, bring the longer end behind and under and through the neck opening, and pull tight.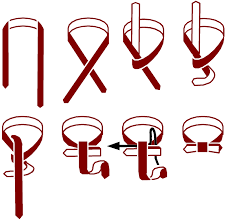
Step 3: Fold the shorter end and bring it close to your neck to make the bowtie shape.
Step 4: Take the longer end and drape it over the top in the middle.
Step 5: Bring both ends of the bowtie together and you should see a hole in the back. Take the
long end and pull it through the hole.
Step 6: Now you have a bowtie, just tighten the ends and adjust to your liking.
Even though the thought of tying a tie seems simple to do off the top of your head, it may end up being very difficult if you are confused or don’t know how. But, after learning, it is super easy and only takes a minute or two. No one wants to get put in a situation where a tie is the only thing holding them back especially if you’re running late, but thankfully, you now know how to tie a tie.